Microsoft Dynamics
Introduce a new level of efficiency and effectiveness to your sales, marketing and customer reference teams. With the RO Innovation + Microsoft Dynamics integration you can:
- Shorten sales cycles to drive new revenue faster
- Boost productivity of your sales team and get new reps up to speed faster
- Increase usage and adoption of your CRM and RO Innovation investments
- Ensure salespeople have effective assets at their fingertips
- Streamline the customer reference request process
- Report effectiveness, ROI and revenue influenced by marketing content and customer references
- Maintain cleaner customer data and records from one seamless system
How Does It Work?
This integration enables seamless user access to the RO Innovation platform from a user’s Dynamics account and enables access to the following RO features:
- Find Assets & Send Spotlights
- Find & Request a Reference
- Nominate a Reference
- Review status of reference requests & nominations
Note: The RO Platform is the system of record for Nominations, Reference Management. Microsoft Dynamics is the system of record for all other data.
- Cater to the daily workflows of sales reps in your CRM
- Increase sales productivity: send the right materials to potential customers at the right time
- Real-time tracking intelligence helps close more deals, faster
- Proactively push the most relevant sales content and customer references to the rep based on their Opportunity
- Tie references to closed deals for ROI reports at your fingertips
- Intuitive integration points streamline reference workflows (like nomination and request submissions)
- Increases productivity of sales and marketing teams
- Manage data in one system instead of two: leverage SugarCRM as the system of record for customer data
Getting Started with Integration & Customization
Prior to installation, you should have been provided with the zip file containing the RO Platform managed solution, called ROPlatform_2_5_0_managed.zip. Once you have uploaded the package, please be sure to "Publish All Customizations." After you have uploaded the solution, and prior to meeting with Upland RO support to finalize customization, there are several prerequisite actions you must complete.
Note: A few extra steps are needed to fully integrate the RO Platform with your instance of Microsoft Dynamics. Installing the solution will enable seamless integration between the RO Platform and Microsoft Dynamics. However, your organization will need to contact Upland Software for service enablement. We highly recommend that you allow us to guide you through the configuration process, but provide this information for reference.
Register our application (called "ROI") with your Azure Active Directory instance.
Note: You will only need to do this once, regardless of the number of Dynamics instances into which the Upland RO managed solution is installed.
- Navigate to the following URL: https://login.microsoftonline.com/{your-tenant-id}/oauth2/authorize?client_id=bff01d1a-4141-4090-8e5f-77f51765c66e&response_type=code&redirect_uri=https%3A%2F%2Frv.roinnovation.com%2Frvgateway%2Fdynamics.aspx&prompt=admin_consent.
- Replace {your-tenant-id} with your Azure Tenant ID. To locate your Azure Tenant ID:
- Log into Azure as an administrator.
- Within the Azure portal, navigate to: Azure Active Directory | Manage | Properties.
- Copy the Tenant ID. This is used when you download and install the managed package.
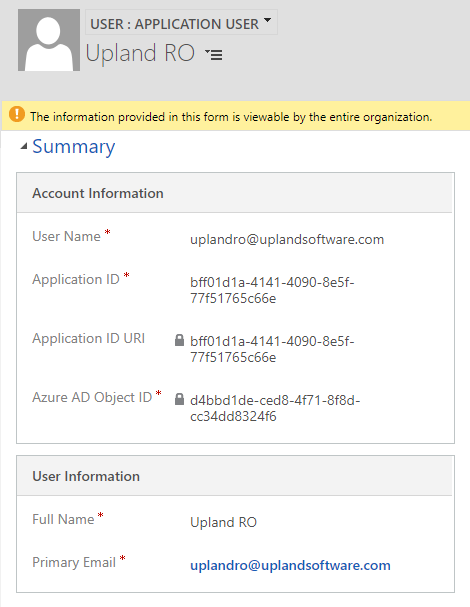
Create an Application User in your Microsoft Dynamics organization.
- Navigate to: Microsoft Dynamics | Settings | System | Security | Users.
- Filter by the list of user types by selecting Application Users from the dropdown menu.
- Click +New to add your Upland RO application user.
- Enter the following information:
Field Value User Name uplandro@uplandsoftware.com Application ID bff01d1a-4141-4090-8e5f-77f51765c66e Application ID URI bff01d1a-4141-4090-8e5f-77f51765c66e Azure AD Object ID bff01d1a-4141-4090-8e5f-77f51765c66e Full Name Upland RO Primary Email uplandro@uplandsoftware.com - Click Save.
- Click the Manage Roles option in the ribbon. The "Manage User Roles" dialog will appear.
- Select the ROPlatform_RoleForIntegrationAccount checkbox.
- Click OK.
Take note of your Microsoft Dynamics TenantID. To locate your TenantID:
- Navigate to: Microsoft Dynamics | Settings | Customization | Customizations | Developer Resources.
- Locate the ID field within the Instance Reference Information section. This is a GUID that uniquely identifies your company's instance of Dynamics 365.
- Provide RO with the Instance Reference Information GUID.
Security Roles
The RO Enablement solution contains two Security Roles:
- ROPlatform_RoleForIntegrationAccount
- ROPlatform_RoleForUsers
The first security role, ROPlatform_RoleForIntegrationAccount, should be given to the RO Integration user. We recommend you use this Security Role, which grants the following permissions:
- Read permissions at the Organization level for Accounts, Contacts, Opportunities, Product, Team, and Users.
- Read permissions for Attribute Map, Entity, Field, Plug-in Assembly, Plug-in Type, Relationship, Sdk Message Processing Step, Sdk Message Processing Step Image, and Sdk Message Processing Step Secure Configuration.
Note: These are the minimum requirements. If the organization wishes to limit the number of fields exposed on accounts, contacts and/or opportunities, Upland RO support can work with the organization to implement this configuration. This is the role you applied when you Create a Microsoft Dynamics Application User .
This role is meant for RO Platform users. It grants read access to the virtual entities that show audit trail information on contacts and opportunities, as well as the OData V4 Data Source. Users need this security role to obtain the full package experience. The four virtual entities are
- ROI Nomination
- ROI Request
- ROI Sales Win
- ROI Spotlight Activity
Configuring Navigation
Once the solution is installed, RO Enablement label will appear under the Sales section on the left side navigation menu.
Note: This does not apply if you are on the Unified Interface.
If desired, you can change the label for "RO Enablement."
Example: You might wish to call the tab "Reference View."
- Navigate to: Microsoft Dynamics | Settings | Customization | Customizations | Customize the System. The "Power Apps" page will appear.
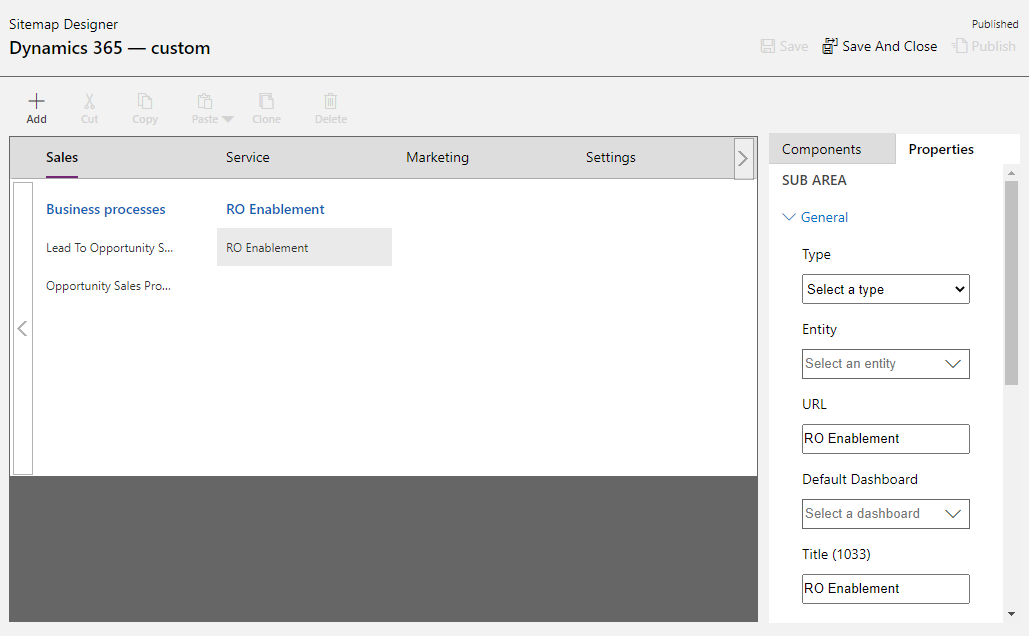
- Within the "Power Apps" page, open the Site Map Default Solution. The "Sitemap Designer" page will appear.
- Within the "Sitemap Designer" page, select the Sales tab.
- Scroll all the way to the right and select the RO Enablement Sub Area.
- Open the Properties tab within the RO Enablement Sub Area.
- Enter a new label name into the Title (1033) field.
- Click Save And Close.
- Click Publish.
If you are using the Unified Interface, you may wish to organize the RO Enablement tab differently. To do this, you must add the RO Enablement web resource to a model-driven application.
- Navigate to: Microsoft Dynamics | Settings | Customization | Customizations | Customize the System. The "Power Apps" page will appear.
- Within the "Power Apps" page, open the Site Map Default Solution. The "Sitemap Designer" page will appear.
- Choose the group where you want to add the RO Enablement menu item.
- Click +Add and select Subarea from the dropdown menu.
- Add the following to your new subarea:
Sub Area Fields Values Type Web Resource URL RO Enablement Title (1033) RO Enablement
Note: You can name this whatever you want.
Icon /WebResources/roi_ReferenceView_16x16SVG Parameter Passing Enabled - Click Save And Close.
- Click Publish.
Setting Up the Application Ribbon
The RO Enablement solution installs modifications to the Account, Opportunity and Contact ribbons by default.
Note: If you wish to change these, you will need to use the XrmToolboxor a similar tool to change the buttons that appear on the toolbar, or follow Microsoft's Export, prepare to edit, and import the ribbon instructions.
Setting Up Virtual Entities
In order to use the RO related lists that are available in Microsoft Dynamics, it is necessary to change the ROI virtual entity data source. To do this, you must use the OrgID that you retrieved during Getting Started with Integration & Customization.
- Navigate to: Microsoft Dynamics | Settings | System | Administration | Virtual Entity Data Sources.
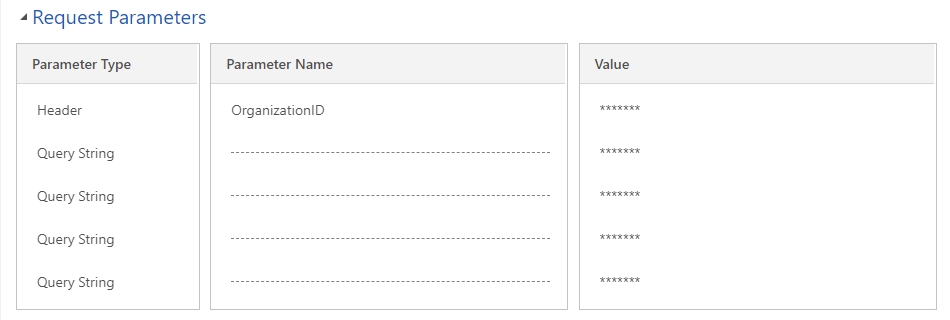
- Select the ROI Data Source.
- Locate the OrganizationID parameter within the Request Parameters section.
- Click the corresponding ******* Value and replace it with your OrgID. This is the OrgID that you retrieved during Getting Started with Integration & Customization.
- Click Save.
Note: For production, change the URL value within the General section to https://rv.roinnovation.com/odata.
Enhancements
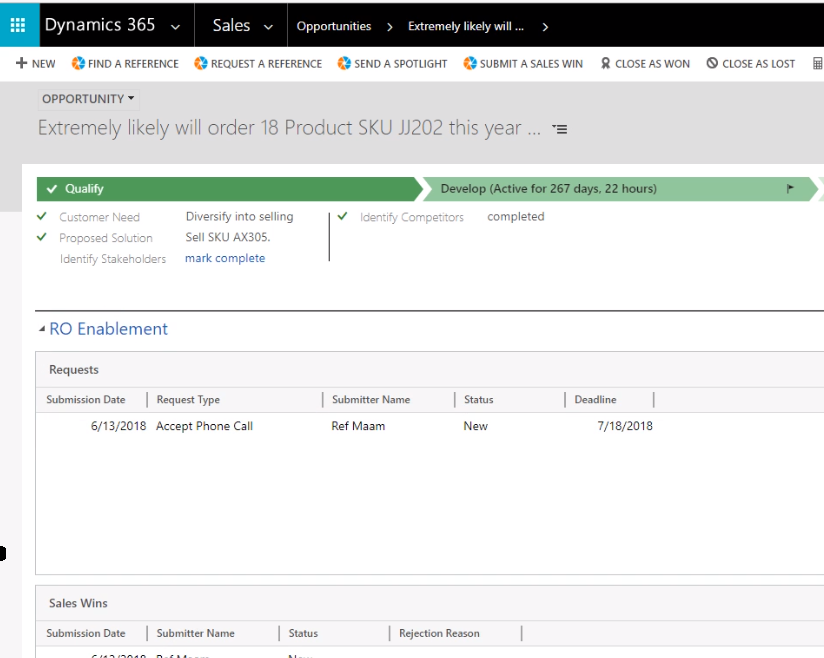
With this release, we have enhanced the integration between RO Innovation and Microsoft Dynamics. Opportunity Records in Dynamics can now display an RO Sales Enablement Section that pulls data from the RO Platform in real-time. This way, Sales users can work from their CRM while maintaining easy access to frequently used RO functionality.
New Integration Functionality
- From Dynamics, users can access RO Sales Enablement options including Ready Assets and Quick Plays.
- From Dynamics, users can find a Reference, request a Reference, send a Spotlight, and submit a Sales Win.
How to Enable: Please submit an enhancement request to enable this integration.
Note: Users must provide their own Microsoft Dynamics licenses.
Platform: All